RECENT BLOG NEWS
wolfSSL Support for the Espressif ESP-IDF v5.2 Beta
Recently Espressif announced their ESP-IDF v5.2 Beta 1 on GitHub. The same day we found out about this exciting new version, we confirmed that all the wolfSSL Espressif ESP32 Examples are working in that environment. So far the “beta” looks to be well polished from our perspective. Last week, we learned about the ESP-IDF v5.2 Beta 2 on GitHub. The final release should be quite nice.
We have both core performance, benchmark, and client-server examples as well as additional examples for the ESP32.
Incorporating wolfSSL in your Espressif project has never been easier. As announced in the summer of 2023 – wolfSSL is now available in the Espressif ESP Registry of managed components: this one line adds wolfSSL to your project:
# Add wolfSSL component to existing ESP-IDF project
idf.py add-dependency "wolfssl/wolfssl"
Get Started with wolfSSL
Additional information on getting Started with wolfSSL on the Espressif environment is available on the wolfSSL GitHub repository as well as this YouTube recording:
Find out more
If you have any feedback, questions, or require support, please don’t hesitate to reach out to us via facts@wolfSSL.com or call us at +1 425 245 8247, or open an issue on GitHub.
Download wolfSSL Now
wolfSSH – Now Available as an Espressif Managed Component Includes SSH Echo Server Example
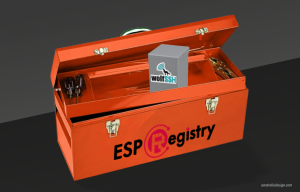
Not long ago, we announced preview support for new Espressif Managed Components. This is in addition to the core wolfssl managed component. Today you can add SSH capabilities to your toolbox by visiting this link:
https://components.espressif.com/components/wolfssl/wolfssh
If the ESP Registry page does not fully load with all the text, try holding down the “ctrl” key when pressing the refresh button in your browser. The CDN seems to occasionally cache incomplete web content.
Getting started with wolfSSL and wolfSSH has never been easier! You can add wolfSSH to your project with this command:
idf.py add-dependency “wolfssl/wolfssh”
We’ve also included a complete example project to connect to the AWS IoT MQTT. Just click the little “copy” icon and paste into a command prompt after the ESP-IDF has been installed:
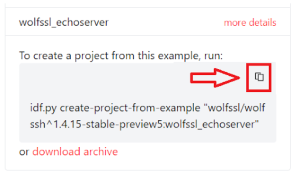
Try it
Here’s an example of how the example can be created, built, and flashed onto your ESP32:
# Setup the ESP-IDF Environment (your actual path may vary)
. ~/esp/esp-idf/export.sh
# Download and create the example
idf.py create-project-from-example “wolfssl/wolfssh:wolfssh_echoserver”
cd wolfssl_echoserver
# Set your SSID and wifi Password in Example Connection Configuration
idf.py menuconfig
# Flash the code to your ESP32
idf.py -p /dev/ttyS9 -b 115200 flash monitor
The full wolfSSL repository for wolfSSH contains even more examples for not only this Echo Server Example, but many other target platforms as well.
Get Started with wolfSSL
Additional information on getting Started with wolfSSL on the Espressif environment is available on the wolfSSL GitHub repository as well as this YouTube recording:
Find out more
If you have any feedback, questions, or require support, please don’t hesitate to reach out to us via facts@wolfSSL.com, call us at +1 425 245 8247, or open an issue on GitHub.
Download wolfSSL Now
Live Webinar: Getting Started with wolfSSH in 2024
Join us for a webinar on ‘Getting Started with wolfSSH‘ scheduled for January 18th at 10 am PT. The latest release, wolfSSH v1.4.15, has just been unveiled as part of our Christmas releases! Packed with numerous features and improvements, this version promises an enriching experience.
wolfSSL Software Developer, Jacob Barthelmeh, will be your guide, starting from foundational knowledge and leading you to explore advanced features essential for initiating your journey with wolfSSH!
Watch the webinar here: Getting Started with wolfSSH
Sneak Peek of the webinar:
- SSH Overview
- Specifications supported by wolfSSH
- wolfSSH Architecture
- Configuration and Build Proces
- wolfSSH Examples and Applications
… and much more
Given that 2024 has just begun, this is an ideal moment to be part of our ‘Getting Started’ series! Don’t miss this chance to leverage the expertise of wolfSSL and harness wolfSSH’s potential for your projects! Bring all your wolfSSH-related questions; Jacob is ready to address them.
If you have questions about any of the above, please contact us at facts@wolfSSL.com or call us at +1 425 245 8247.
Download wolfSSL Now
wolfMQTT – Now Available as an Espressif Managed Component Includes AWS IoT MQTT Example
Not long ago, we announced preview support for new Espressif Managed Components in addition to the core wolfssl managed component. Today you can add MQTT capabilities to your toolbox by visiting this link:
https://components.espressif.com/components/wolfssl/wolfmqtt
If the ESP Registry page does not fully load with all the text, try holding down the “ctrl” key when pressing the refresh button in your browser. The CDN seems to occasionally cache incomplete web content.
Getting started with wolfSSL and wolfMQTT has never been easier! You can add wolfMQTT to your project with this command:
idf.py add-dependency “wolfssl/wolfmqtt”
We’ve also included a complete example project to connect to the AWS IoT MQTT. Just click the little “copy” icon and paste into a command prompt after the ESP-IDF has been installed:
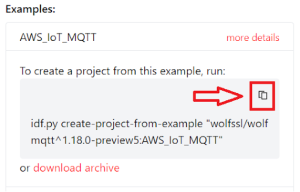
Try it
Here’s an example of how the example can be created, built, and flashed onto your ESP32:
# Setup the ESP-IDF Environment (your actual path may vary)
. ~/esp/esp-idf/export.sh
# Download and create the example
idf.py create-project-from-example “wolfssl/wolfmqtt:AWS_IoT_MQTT”
cd AWS_IoT_MQTT
# Set your SSID and wifi Password in Example Connection Configuration
idf.py menuconfig
# Flash the code to your ESP32
idf.py -p /dev/ttyS9 -b 115200 flash monitor
Tada! You have your very own sample MQTT AWS IoT device! Upon a successful connection, output similar to this should be displayed on the serial port being monitored:
I (17096) wolfmqtt main: Initial Stack Used (before wolfSSL Server): 2244 bytes
I (17104) wolfmqtt main: Starting awsiot_main...

AwsIoT Client: QoS 1, Use TLS 1
MQTT Net Init: Success (0)
MQTT Init: Success (0)
NetConnect: Host a2dujmi05ideo2-ats.iot.us-west-2.amazonaws.com, Port 8883, Timeout 5000 ms, Use TLS 1
MQTT TLS Setup (1)
MQTT TLS Verify Callback: PreVerify 0, Error -188 (ASN no signer error to confirm failure)
  Subject's domain name is Starfield Services Root Certificate Authority - G2
  Allowing cert anyways
MQTT Socket Connect: Success (0)
MQTT Connect: Proto (v3.1.1), Success (0)
MQTT Connect Ack: Return Code 0, Session Present 0
MQTT Subscribe: Success (0)
  Topic $aws/things/demoDevice/shadow/update, Qos 1, Return Code 1
MQTT Publish: Topic $aws/things/demoDevice/shadow/update, ID 2, Success (0)
MQTT Waiting for message...
MQTT Message: Topic $aws/things/demoDevice/shadow/update, Qos 1, Len 92
Payload (0 - 92) printing 80 bytes:
{"state":{"reported":{"hardware":{"type":"wolf_aws_iot_demo","firmware_version":
MQTT Message: Done
The full wolfSSL repository for wolfMQTT contains even more examples for not only this Espressif AWS example, but many other target platforms as well.
Get Started with wolfSSL
Additional information on getting Started with wolfSSL on the Espressif environment is available on the wolfSSL GitHub repository as well as this YouTube recording:
If you have questions about any of the above, please contact us at facts@wolfSSL.com or call us at +1 425 245 8247.
Download wolfSSL Now
Everything cURL: Your Comprehensive Guide
Get ready to delve into the latest edition of Everything cURL. Daniel Stenberg, the driving force behind cURL, has meticulously crafted the most recent release.
In this comprehensive update of Everything cURL, he’ll take you on an exciting journey through the vast landscape of cURL. Discover not just the technical knowledge but also delve into the origin stories that make this tool a favorite among developers globally.
Everything cURL equips you with a collection of tools, mastering cURL command lines, options, and functionalities at a master level. Whether you seek guidance on crafting HTTP requests or wish to master cURL scripting for automation, this edition covers it all.
It’s your sign to step into the world of cURL. Explore the pages of Everything cURL and uncover the key elements necessary to elevate your development journey with this recent update.
Are you ready to embrace the future of cURL?
Dive into Everything cURL today to kickstart your journey into the world of advanced cURL commands, API usage, and more.
If you have questions about any of the above, please contact us at facts@wolfSSL.com or call us at +1 425 245 8247.
Download wolfSSL Now
Protecting wolfSSH from Passive SSH Key Compromise
About the Compromise
Recently, a team led by Keegan Ryan from UCSD discovered that several implementations of the SSH protocol have been potentially leaking information about their keys and they came up with a way of exploiting it.
Every now and then, an RSA signature is made with a combination of padding and data that doesn’t verify correctly. If one saves billions of SSH signatures they can analyze the broken signatures and work out some keys.
The team released a paper [1] describing the issue and how it can be analyzed to obtain keys.
The wolfSSH Vulnerability
While wolfSSL verifies an RSA signature after producing it, and erroring out if it doesn’t verify, wolfSSH does not do this process. The compromise has not been proven against wolfSSH, the assumption is that it is possible. wolfSSH did not verify the RSA signatures after generation.
The Fix
As of wolfSSH v1.4.15, just released, we have added the verify step for RSA signatures. Luckily the time to verify an RSA signature is short compared to signing so there shouldn’t be a noticeable slowdown during the key exchange process.
References
- Keegan Ryan, Kaiwen He, George Arnold Sullivan, and Nadia Heninger. 2023. Passive SSH Key Compromise via Lattices. Cryptology ePrint Archive, Report 2023/1711. https://eprint.iacr.org/2023/1711.
If you have questions about any of the above, please contact us at facts@wolfSSL.com or call us at +1 425 245 8247.
Download wolfSSL Now
wolfSSL Using an fTPM with Xilinx FPGA Microblaze
Have you ever needed a TPM but only had an FPGA available, or needed a TPM for a project and had additional requirements that are not supported by current hardware available? wolfSSL is working on the use of a fTPM (Firmware Trusted Platform Module) running on a Xilinx FPGA Microblaze that is also capable of being used with measured boot. This is unique, in that it can benefit from the additional redundancy that naturally comes with running code on an FPGA while leveraging an existing piece of the hardware on many Xilinx boards rather than requiring additional hardware be added. Use of the fTPM for measured boot will improve sanity checks on the integrity of the boot up process by doing TPM 2.0 PCR extend operations on the initial ROM, FSBL, and partitions loaded.
If you have questions about any of the above, please contact us at facts@wolfSSL.com or call us at +1 425 245 8247.
Download wolfSSL Now
Espressif RISC-V Hardware Accelerated Cryptographic Functions Up to 1000% Faster than Software

We at wolfSSL continue to embrace the IoT market and congratulate all of the Espressif staff and partners on reaching the 1 Billion Device milestone in 2023. All of those devices need serious, commercial grade security with up to 7×24 support. We are here to help you do that! Of course, wolfSSL software cryptography works on any embedded device, but we’ve also added additional hardware acceleration support to Espressif SoC devices.
Recently our wolfSSL library has been upgraded to support the cryptographic hardware acceleration capabilities on Espressif ESP32 RISC-V SoC boards, specifically the ESP32-C2, ESP32-C3 and the ESP32-C6. The feature set is parity with our ESP32 and ESP32-S2/ESP32-S3 hardware acceleration capabilities which includes SHA (hash), RSA (big number math), and AES encryption. Additional new acceleration hardware capabilities specific to the newer Espressif chipsets are actively in development.
Although we are very proud of our software implementation, no programmatic algorithm can beat the brute strength of hardware acceleration. See below for some of the benchmark performance characteristics. The difference can be up to 10 times faster than equivalent software algorithms.
For instance: The ESP32-C6 has SHA acceleration implemented in hardware for SHA, SHA-224 and SHA-256, all of which are commonly used in TLS hashes. Here’s a comparison of the differences in performance for the ESP32C6:

Taller bars represent more data hashed per second: KiB/s
Note the Espressif GitHub Issue #10423 for the latest ESP32-C6 support status. Silicon version 0.0 was used for testing and benchmarks noted above. Actual production values may differ.
See also our recent blogs:
- Secure Your Apple HomeKit Espressif ESP32 Devices with wolfSSL
- wolfSSL DTLS1.3 ESP32 Examples Now Available
- wolfSSL on the Espressif ESP32-C3 RISC-V
- wolfSSL on the Xtensa ESP32-S3 Linux
Additional information on getting Started with wolfSSL on the Espressif environment is available on the wolfSSL GitHub repository as well as a webinar recording, Getting Started with wolfSSL on the Espressif ESP32.
Try it yourself
If you’d like to see the benchmarks on your own device, ensure you have the ESP-IDF installed and follow these steps:
cd [your workspace directory]

# Clone wolfSSL into a local directory
git clone https://github.com/wolfSSL/wolfssl.git
cd wolfssl/IDE/Espressif/ESP-IDF/examples/wolfssl_benchmark

# Set your directory for ESP-IDF, shown here for VisualDGB and WSL
WRK_IDF_PATH=/mnt/c/SysGCC/esp32/esp-idf/v5.1

# Run your ESP-IDF export.sh
. ${WRK_IDF_PATH}/export.sh
# or
. $HOME/esp/esp-idf/export.sh

# Set project target SoC
idf.py set-target esp32c3

# optionally erase your device (substitute /dev/ttyS36 with your port)
idf.py erase-flash -p /dev/ttyS36 -b 115200

# Build and flash the app onto your SoC (substitute /dev/ttyS36)
idf.py build flash -p /dev/ttyS36 -b 115200 monitor -b 115200
Benchmark metrics for the ESP32-C6, Hardware Encryption Enabled:
Chip is ESP32-C6 (revision v0.0), Crystal is 40MHz, cpu freq: 160000000 Hz (160MHz)
------------------------------------------------------------------------------
wolfSSL version 5.6.4
------------------------------------------------------------------------------
wolfCrypt Benchmark (block bytes 1024, min 1.0 sec each)
RNG                       1375 KiB took 1.005 seconds
AES-128-CBC-enc           4450 KiB took 1.004 seconds
AES-128-CBC-dec           4325 KiB took 1.004 seconds
AES-192-CBC-enc           1450 KiB took 1.014 seconds
AES-192-CBC-dec           1425 KiB took 1.010 seconds
AES-256-CBC-enc           4425 KiB took 1.001 seconds
AES-256-CBC-dec           4300 KiB took 1.001 seconds
AES-128-GCM-enc            450 KiB took 1.044 seconds
AES-128-GCM-dec            450 KiB took 1.044 seconds
AES-192-GCM-enc            425 KiB took 1.002 seconds
AES-192-GCM-dec            425 KiB took 1.002 seconds
AES-256-GCM-enc            425 KiB took 1.004 seconds
AES-256-GCM-dec            425 KiB took 1.005 seconds
GMAC Default               602 KiB took 1.000 seconds
3DES                       400 KiB took 1.051 seconds
MD5                      10775 KiB took 1.000 seconds
SHA                      12675 KiB took 1.000 seconds
SHA-224                  12625 KiB took 1.001 seconds
SHA-256                  12625 KiB took 1.001 seconds
SHA-384                   1275 KiB took 1.003 seconds
SHA-512                   1275 KiB took 1.003 seconds
SHA-512/224               1275 KiB took 1.003 seconds
SHA-512/256               1275 KiB took 1.003 seconds
SHA3-224                   925 KiB took 1.005 seconds
SHA3-256                   875 KiB took 1.008 seconds
SHA3-384                   675 KiB took 1.010 seconds
SHA3-512                   475 KiB took 1.019 seconds
SHAKE128                  1075 KiB took 1.009 seconds
SHAKE256                   875 KiB took 1.008 seconds
RIPEMD                    4325 KiB took 1.001 seconds
HMAC-MD5                 10650 KiB took 1.001 seconds
HMAC-SHA                 12475 KiB took 1.001 seconds
HMAC-SHA224              12425 KiB took 1.001 seconds
HMAC-SHA256              12425 KiB took 1.001 seconds
HMAC-SHA384               1275 KiB took 1.019 seconds
HMAC-SHA512               1275 KiB took 1.019 seconds
PBKDF2                       1 KiB took 1.005 seconds
RSA     1024  key gen         1 ops took 1.262 sec, avg 1262.000 ms
RSA     2048  key gen         1 ops took 1.680 sec, avg 1680.000 ms
RSA     2048   public         6 ops took 1.415 sec, avg 235.833 ms
RSA     2048  private         2 ops took 1.040 sec, avg 520.000 ms
ECC   [      SECP256R1]   256  key gen         4 ops took 1.290 sec, avg 322.500 ms
ECDHE [      SECP256R1]   256    agree         4 ops took 1.280 sec, avg 320.000 ms
ECDSA [      SECP256R1]   256     sign         4 ops took 1.296 sec, avg 324.000 ms
ECDSA [      SECP256R1]   256   verify         2 ops took 1.240 sec, avg 620.000 ms
CURVE  25519  key gen         4 ops took 1.276 sec, avg 319.000 ms
CURVE  25519    agree         4 ops took 1.275 sec, avg 318.750 ms
ED     25519  key gen        88 ops took 1.008 sec, avg 11.455 ms
ED     25519     sign        78 ops took 1.022 sec, avg 13.103 ms
ED     25519   verify        52 ops took 1.009 sec, avg 19.404 ms

Benchmark complete
Benchmark metrics for the ESP32-C6, Hardware Encryption Disabled:
Chip is ESP32-C6 (revision v0.0), Crystal is 40MHz, cpu freq: 160000000 Hz (160MHz)
------------------------------------------------------------------------------
wolfSSL version 5.6.4
------------------------------------------------------------------------------
wolfCrypt Benchmark (block bytes 1024, min 1.0 sec each)
RNG                        600 KiB took 1.023 seconds
AES-128-CBC-enc           1725 KiB took 1.004 seconds
AES-128-CBC-dec           1700 KiB took 1.010 seconds
AES-192-CBC-enc           1500 KiB took 1.014 seconds
AES-192-CBC-dec           1475 KiB took 1.013 seconds
AES-256-CBC-enc           1325 KiB took 1.017 seconds
AES-256-CBC-dec           1300 KiB took 1.012 seconds
AES-128-GCM-enc            475 KiB took 1.041 seconds
AES-128-GCM-dec            475 KiB took 1.042 seconds
AES-192-GCM-enc            450 KiB took 1.030 seconds
AES-192-GCM-dec            450 KiB took 1.030 seconds
AES-256-GCM-enc            425 KiB took 1.012 seconds
AES-256-GCM-dec            425 KiB took 1.012 seconds
GMAC Default               621 KiB took 1.000 seconds
3DES                       400 KiB took 1.051 seconds
MD5                      10750 KiB took 1.000 seconds
SHA                       5525 KiB took 1.002 seconds
SHA-224                   1450 KiB took 1.002 seconds
SHA-256                   1450 KiB took 1.001 seconds
SHA-384                   1275 KiB took 1.004 seconds
SHA-512                   1275 KiB took 1.003 seconds
SHA-512/224               1275 KiB took 1.003 seconds
SHA-512/256               1275 KiB took 1.003 seconds
SHA3-224                   925 KiB took 1.006 seconds
SHA3-256                   875 KiB took 1.008 seconds
SHA3-384                   675 KiB took 1.011 seconds
SHA3-512                   475 KiB took 1.019 seconds
SHAKE128                  1075 KiB took 1.009 seconds
SHAKE256                   875 KiB took 1.008 seconds
RIPEMD                    4325 KiB took 1.000 seconds
HMAC-MD5                 10650 KiB took 1.002 seconds
HMAC-SHA                  5475 KiB took 1.002 seconds
HMAC-SHA224               1450 KiB took 1.010 seconds
HMAC-SHA256               1450 KiB took 1.010 seconds
HMAC-SHA384               1275 KiB took 1.019 seconds
HMAC-SHA512               1275 KiB took 1.018 seconds
PBKDF2                       0 KiB took 1.075 seconds
RSA     1024  key gen         1 ops took 7.733 sec, avg 7733.000 ms
RSA     2048  key gen         1 ops took 28.050 sec, avg 28050.000 ms
RSA     2048   public        58 ops took 1.028 sec, avg 17.724 ms
RSA     2048  private         2 ops took 7.051 sec, avg 3525.500 ms
ECC   [      SECP256R1]   256  key gen         4 ops took 1.231 sec, avg 307.750 ms
ECDHE [      SECP256R1]   256    agree         4 ops took 1.225 sec, avg 306.250 ms
ECDSA [      SECP256R1]   256     sign         4 ops took 1.241 sec, avg 310.250 ms
ECDSA [      SECP256R1]   256   verify         2 ops took 1.178 sec, avg 589.000 ms
CURVE  25519  key gen         4 ops took 1.277 sec, avg 319.250 ms, 3.132 ops/sec
CURVE  25519    agree         4 ops took 1.276 sec, avg 319.000 ms, 3.135 ops/sec
ED     25519  key gen        87 ops took 1.001 sec, avg 11.506 ms, 86.913 ops/sec
ED     25519     sign        78 ops took 1.018 sec, avg 13.051 ms, 76.621 ops/sec
ED     25519   verify        52 ops took 1.023 sec, avg 19.673 ms, 50.831 ops/sec
Benchmark complete
Find out more
If you have any feedback, questions, or require support, please don’t hesitate to reach out to us via facts@wolfSSL.com, call us at +1 425 245 8247, or open an issue on GitHub.
Download wolfSSL Now
wolfMQTT: support for curl easy socket backend
Do you have a need for using MQTT with an http proxy? Users of libcurl know that they can leverage wolfSSL to provide TLS for their applications, and thus enjoy the advantages of both libcurl for data transport and handling http proxies, and wolfSSL for transport security. In this vein, we’ve created a new network layer interface for wolfMQTT that uses libcurl’s easy interface as an optional backend. When enabled, wolfMQTT will use the libcurl easy API (such as curl_easy_send) for the socket backend, while libcurl in turn will use wolfSSL to negotiate TLS. Currently both TLS and mTLS are supported.
You can find our newly added curl easy socket example in examples/mqttnet.c. To try it out, simply build wolfMQTT with –enable-curl. The only prerequisites for this are that wolfSSL has been built with –enable-curl, and curl built with –enable-wolfssl. Supported options with wolfMQTT’s –enable-curl include multithreading (–enable-mt), nonblocking (–enable-nonblock), and as previously mentioned TLS.
If you’re curious for more details, you can look at our updated readme and pull request.
If you have questions about any of the above, please contact us at facts@wolfSSL.com or call us at +1 425 245 8247.
Download wolfSSL Now
Live Webinar: Getting Started with wolfSSL in 2024
Welcome to our exclusive webinar, ‘Getting Started with wolfSSL in 2024’. Join us for an insightful session presented by Chris Conlon, wolfSSL Engineering Manager. Scheduled for January 4th at 9 am PT, this webinar is your gateway to mastering wolfSSL, the ultimate Embedded SSL/TLS Library for IoT device security, advanced encryption algorithms and much more.
wolfSSL has earned a reputation for high-quality, portable, and embedded security software, securing over 2 billion applications and devices.
Watch the webinar here: Getting Started with wolfSSL in 2024
Chris will delve into a wide array of topics:
- Overview of TLS 1.3
- wolfSSL package structure
- Building wolfSSL
- wolfCrypt Test and Benchmark Applications
- wolfSSL basic API usage
- Tips on debugging
And much more
This is your chance to grasp the essential details of utilizing wolfSSL, learning its fundamentals, and discovering the best practices for leveraging wolfSSL throughout 2024.
If you have questions about any of the above, please contact us at facts@wolfSSL.com or call us at +1 425 245 8247.
Download wolfSSL Now
Weekly updates
Archives
- April 2025 (19)
- March 2025 (22)
- February 2025 (21)
- January 2025 (23)
- December 2024 (22)
- November 2024 (29)
- October 2024 (18)
- September 2024 (21)
- August 2024 (24)
- July 2024 (27)
- June 2024 (22)
- May 2024 (28)
- April 2024 (29)
- March 2024 (21)
- February 2024 (18)
- January 2024 (21)
- December 2023 (20)
- November 2023 (20)
- October 2023 (23)
- September 2023 (17)
- August 2023 (25)
- July 2023 (39)
- June 2023 (13)
- May 2023 (11)
- April 2023 (6)
- March 2023 (23)
- February 2023 (7)
- January 2023 (7)
- December 2022 (15)
- November 2022 (11)
- October 2022 (8)
- September 2022 (7)
- August 2022 (12)
- July 2022 (7)
- June 2022 (14)
- May 2022 (10)
- April 2022 (11)
- March 2022 (12)
- February 2022 (22)
- January 2022 (12)
- December 2021 (13)
- November 2021 (27)
- October 2021 (11)
- September 2021 (14)
- August 2021 (10)
- July 2021 (16)
- June 2021 (13)
- May 2021 (9)
- April 2021 (13)
- March 2021 (24)
- February 2021 (22)
- January 2021 (18)
- December 2020 (19)
- November 2020 (11)
- October 2020 (3)
- September 2020 (20)
- August 2020 (11)
- July 2020 (7)
- June 2020 (14)
- May 2020 (13)
- April 2020 (14)
- March 2020 (4)
- February 2020 (21)
- January 2020 (18)
- December 2019 (7)
- November 2019 (16)
- October 2019 (14)
- September 2019 (18)
- August 2019 (16)
- July 2019 (8)
- June 2019 (9)
- May 2019 (28)
- April 2019 (27)
- March 2019 (15)
- February 2019 (10)
- January 2019 (16)
- December 2018 (24)
- November 2018 (9)
- October 2018 (15)
- September 2018 (15)
- August 2018 (5)
- July 2018 (15)
- June 2018 (29)
- May 2018 (12)
- April 2018 (6)
- March 2018 (18)
- February 2018 (6)
- January 2018 (11)
- December 2017 (5)
- November 2017 (12)
- October 2017 (5)
- September 2017 (7)
- August 2017 (6)
- July 2017 (11)
- June 2017 (7)
- May 2017 (9)
- April 2017 (5)
- March 2017 (6)
- January 2017 (8)
- December 2016 (2)
- November 2016 (1)
- October 2016 (15)
- September 2016 (6)
- August 2016 (5)
- July 2016 (4)
- June 2016 (9)
- May 2016 (4)
- April 2016 (4)
- March 2016 (4)
- February 2016 (9)
- January 2016 (6)
- December 2015 (4)
- November 2015 (6)
- October 2015 (5)
- September 2015 (5)
- August 2015 (8)
- July 2015 (7)
- June 2015 (9)
- May 2015 (1)
- April 2015 (4)
- March 2015 (12)
- January 2015 (4)
- December 2014 (6)
- November 2014 (3)
- October 2014 (1)
- September 2014 (11)
- August 2014 (5)
- July 2014 (9)
- June 2014 (10)
- May 2014 (5)
- April 2014 (9)
- February 2014 (3)
- January 2014 (5)
- December 2013 (7)
- November 2013 (4)
- October 2013 (7)
- September 2013 (3)
- August 2013 (9)
- July 2013 (7)
- June 2013 (4)
- May 2013 (7)
- April 2013 (4)
- March 2013 (2)
- February 2013 (3)
- January 2013 (8)
- December 2012 (12)
- November 2012 (5)
- October 2012 (7)
- September 2012 (3)
- August 2012 (6)
- July 2012 (4)
- June 2012 (3)
- May 2012 (4)
- April 2012 (6)
- March 2012 (2)
- February 2012 (5)
- January 2012 (7)
- December 2011 (5)
- November 2011 (7)
- October 2011 (5)
- September 2011 (6)
- August 2011 (5)
- July 2011 (2)
- June 2011 (7)
- May 2011 (11)
- April 2011 (4)
- March 2011 (12)
- February 2011 (7)
- January 2011 (11)
- December 2010 (17)
- November 2010 (12)
- October 2010 (11)
- September 2010 (9)
- August 2010 (20)
- July 2010 (12)
- June 2010 (7)
- May 2010 (1)
- January 2010 (2)
- November 2009 (2)
- October 2009 (1)
- September 2009 (1)
- May 2009 (1)
- February 2009 (1)
- January 2009 (1)
- December 2008 (1)


