It’s never been easier to get started with wolfSSL on Microsoft Windows using Visual Studio 2022!
New VS2022-specific project and solutions files have been created for both the wolfssl/wolfcrypt core library, as well as the test and benchmark examples. These files are available immediately on GitHub and are included in the recent release.
For long term customers and backward-compatibility, we’ve had older versions of Visual Studio that generally would update to whatever latest version might be installed. See our blog post here.
Now with the new VS 2022 files, no more manual adjustments are needed. The project files work immediately out of the box. Just open the project file and click the run button.
Let’s say you’ve just cloned the latest version of wolfSSL from GitHub in your C:\workspace directory:
git clone https://github.com/wolfSSL/wolfssl
The test and benchmark examples also include a vcxproj.user file that aids in pointing the working directory of the project to the root-level wolfSSL to easily find the compiled binary.
To get started with the examples, simply navigate to the wolfCrypt benchmark directory:
C:\workspace\wolfssl\wolfcrypt\benchmark
and open either the benchmark-VS2022.vcxproj project or benchmark-VS2022.sln solution files in Visual Studio 2022.
If you happen to be one of the Windows developers that also uses WSL, you may occasionally see an oddity in Visual Studio’s equivalent of git status as compared to the result from the WSL prompt. The issue is the way Windows might handle file permissions that differ between Windows and Linux when the same file system is shared (e.g. C:\workspace vs /mnt/c/workspace), causing Visual Studio to detect modified files even though there’s no apparent text change. One way to fix this is with this git command:
git config core.fileMode false
Visual Studio may need to be re-launched if it was already already running when the command was entered in a WSL prompt.
When using wolfSSL on Windows, it is a common practice to use a user_settings.h file. There’s an example in the wolfssl/IDE/WIN directory:
https://github.com/wolfSSL/wolfssl/blob/master/IDE/WIN/user_settings.h
The wolfCrypt Benchmark and wolfCrypt Test applications can also be used as reference examples.
Note the beginning of the benchmark.c file. It uses a common pattern of including the wolfssl library:
#ifdef HAVE_CONFIG_H
    #include
#endif

#ifndef WOLFSSL_USER_SETTINGS
    #include
#endif
#include  /* also picks up user_settings.h */
It is important to define the c-compiler preprocessor definition: WOLFSSL_USER_SETTINGS
The #include <wolfssl/wolfcrypt/settings.h> should be listed before any other wolfSSL headers are included. The user_settings.h is included in the settings.h file. The user_settings.h should never be explicitly included in any other source code header.
Beyond the Benchmark and Test Examples
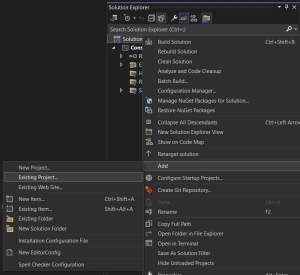
Do you have a project and you’d like to add the wolfssl library? Right-click on the solution file and select “Add – Existing Project…”:

Navigate to the root directory of your wolfSSL source code and add the wolfssl-VS2022.vcxproj file to your solution.
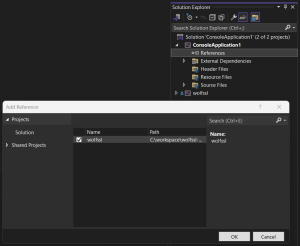
Be sure to also add a reference to each project that will use the wolfssl library. Right click on “references” and add check the “wolfssl” project:

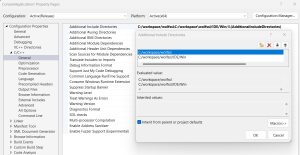
Depending on the directory structure and relative location of the project, the path to the wolfssl source code headers will likely need to be added to the Additional Include Directories. The typical example will be at least for the root directory:
C:/workspace/wolfssl
And oftentimes the user_settings.h as well, shown here in the example IDE/Win directory:
C:/workspace/wolfssl/IDE/Win
The example property page would look like this:

That’s it! Simply build and run the project.
Reorganization Coming Soon
Visual Studio project and solution files will soon be moved to the .\IDE\VS2010.\IDE\VS2022 directories.
The FIPS-related builds currently interspersed in other directories will soon be consolidated and moved to a new .\IDE-FIPS directory. See PR #8126.
For more information:
Post Quantum
Do you have code that can be upgraded to Post Quantum? See our recent blog.
FIPS Certified!
When you are ready to move on to the next step, wolfSSL will be there for you! Need to have your project NIST Certified? Recently we announced that wolfSSL is the First in the World to offer FIPS 140–3 Automated Submission with our NIST Certificate #4718.
For more details, see our blog What is FIPS (long version).
Find out more:
If you have any feedback, questions, or require support, please don’t hesitate to reach out to us via facts@wolfSSL.com, call us at +1 425 245 8247, or open an issue on GitHub.
Download wolfSSL Now

